

")


TẠO DATA ACCESS LAYER
Trong bài này ta sẽ tạo, truy cập và nhận dữ liệu từ DB sử dụng Entity Framework (EF) Code First. Để hiểu được bài này, bạn cần hoàn thành bài trước đó . Về EF thì tài liệu trên mạng cũng khá nhiều, nếu có thời gian mình sẽ viết một bài tóm lại các kiến thức vừa đủ dùng về nó.
Chúng ta sẽ học:
- Tạo data model
- Khởi tạo và thêm dữ liệu vào DB
- Kết nối ứng dụng vào DB.
Các chức năng ta sẽ tìm hiểu:
- Entity Framework Code First
- LocalDB
- Data Annotations
TẠO DATA MODELS
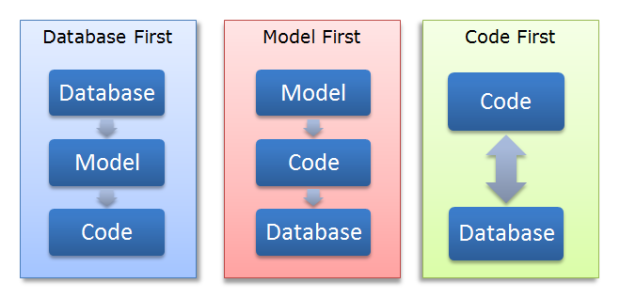
EF là một ORM Framework (ánh xạ đối tượng – quan hệ) giúp chúng ta hoạt động dễ dàng hơn với DB. Tham khảo thêm ở đây. EF hỗ trợ các mô hình sau:
- DB First: sử dụng khi có sẵn DB, EF tự động tạo ra data model và class, đây là cách đơn giản nhất.
- Model First: Ta sẽ tự thiết kế mới một CSDL sao đó EF sẽ tự sinh ra code.
- Code First: ta sẽ tự tạo ra các class của riêng mình, EF sẽ sinh DB dựa trên những gì ta đã viết. Đây là cách được dùng phổ biến nhất.
Các mô hình trong EF
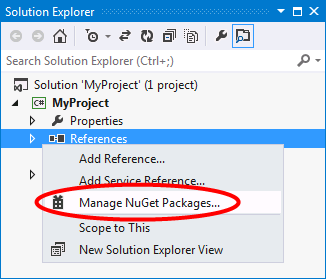
Note: Mặc định trong project của ta đã được thêm sẵn EF, ta có thể thấy trong References các file sau:
- EntityFramework.dll
- EntityFrameworkSqlServer.dll
Nếu không có, ta thêm thủ công bằng cách nhấn chuột phải vào References -> Manage NuGet Packages…Tìm và cài vào project.
Entity Classes
Các class bạn tạo để định nghĩa schema của data gọi là entity class. Để dễ hiểu cứ nghĩ entity class như một table trong database.Mỗi thuộc tính trong class tương ứng với các cột trong 1 bảng ở DB.
Trong Tuts này, bạn sẽ bắt đầu bằng cách thêm một entity class thể hiện schema cho bảng Products và Catagories. Class Products chứa các định nghĩa cho mỗi product, gồm: ProductID, ProductName, Description, ImagePath, UnitPrice, CategoryID và Category. Class Category sẽ chứa các định nghĩa cho mỗi Catagory mà Product thuộc về, ví dụ Car, Boat, or Plane. Các thuộc tính trong Category: CategoryID, CategoryName, Description, and Products. Mỗi Product thuộc về một Category. Class Entity này sẽ được thêm vào folder Model trong project.
- Trong Solution Explorer, thêm thư mục Models, sau đó chọn Add -> New Item.
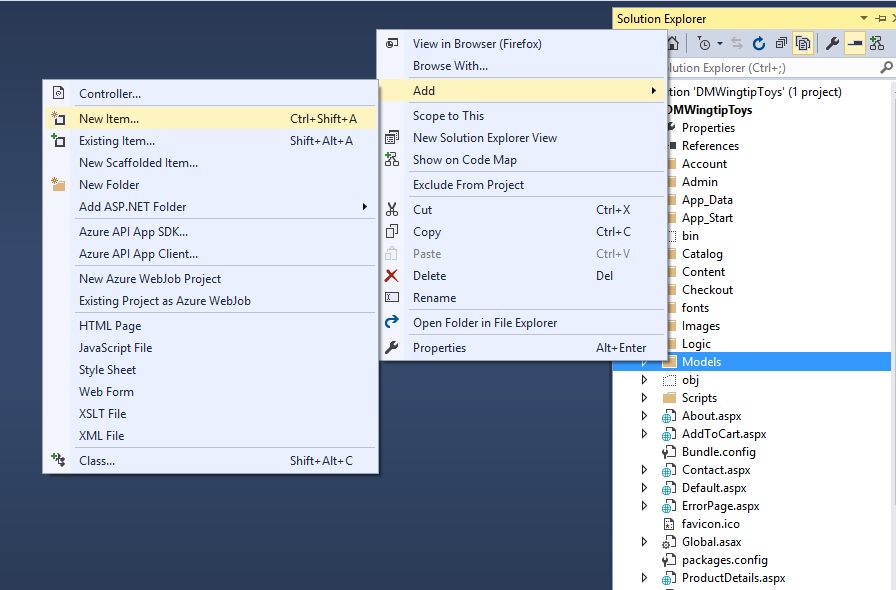
- Ta thêm class có tên Products
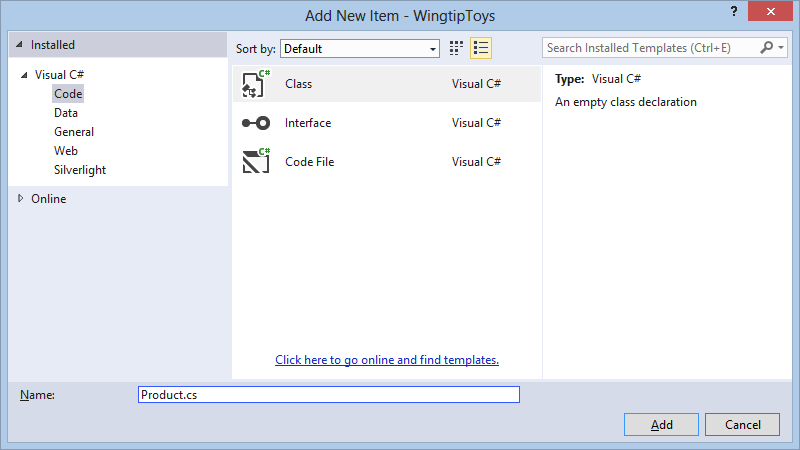
- Gõ đoạn code dưới đây vào class mới tạo
using System.ComponentModel.DataAnnotations;
namespace DMWingtipToys.Models
{
    public class Product
    {
        [ScaffoldColumn(false)]

        public int ProductID { get; set; }


        [Required, StringLength(100), Display(Name = "Name")]

        public string ProductName { get; set; }


        [Required, StringLength(10000), Display(Name = "Product Description"), DataType(DataType.MultilineText)]

        public string Description { get; set; }


        public string ImagePath { get; set; }


        [Display(Name = "Price")]

        public double? UnitPrice { get; set; }


        public int? CategoryID { get; set; }


        public virtual Category Category { get; set; }

    }

}
- Thêm class Category.cs tương tự:
using System.Collections.Generic;

using System.ComponentModel.DataAnnotations;

namespace DMWingtipToys.Models

{

public class Category

{

[ScaffoldColumn(false)]

public int CategoryID { get; set; }

[Required, StringLength(100), Display(Name = "Name")]

public string CategoryName { get; set; }

[Display(Name = "Product Description")]

public string Description { get; set; }

public virtual ICollection<Product> Products { get; set; }

}

}
Như chúng ta đã đề cập, class Category chính là loại của Product (ví dụ: Cars, Boats, Rockets…), tức là mỗi sản phẩm thì sẽ thuộc một loại mặt hàng nhất định. Mỗi Product ứng với mỗi hàng trong DB và mỗi thuộc tính của class Product sẽ map đến mỗi cột tương ứng trong bảng
Data Annotaion
Bạ̣n có thể thấy rằng một số thành phần của class có thuộc tính ở trên đầu của nó. Ví dụ [ScaffoldColumn(false)] (ẩn cột). Đó gọi là Data Annotaions (chú thích). Các thuộc tính của Data Annotation giúp kiểm tra dữ liệu, định dạng và xác định cách nó được mô hình hóa khi DB tạo ra.
Context Class
Để sử dụng các lớp truy cập dữ liệu, ta định nghĩa một context class. Context class quản lí các entity class(ví dụ Product, Category) và giúp truy cập vào DB
Tại folder Models, ta thêm lớp ProductContext.cs với nội dung :
using System.Data.Entity;

namespace DMWingtipToys.Models

{

public class ProductContext : DbContext

{

public ProductContext() : base("WingtipToys")

{

}

public DbSet<Category> Categories { get; set; }

public DbSet<Product> Products { get; set; }

}

}
Đoạn code trên có namspace System.Data.Entity, do đó ta có thể truy cập tất cả các phương thức cốt lõi của Entity Framwork: truy vấn, insert, update, delete dữ liệu bằng cách làm việc với các đối tượng strongly typed(Strongly type giúp bạn truy suất trực tiếp đến các thành phần bên trong như bảng, cột thông qua tên của chúng với sự hỗ trợ của InteliSense, tên, kiểu của dữ liệu được xác định rõ, hạn chế lỗi).
Class ProductContext giúp tìm kiếm, lưu trữ và update table Product trong DB. Class ProductContext kế thừa từ DbContext.
Initializer Class
Ta cần cài thêm vài logic để cài đặt DB trong lần đầu tiên chạy. Cho phép dữ liệu mới thêm vào DB có thể lập tức được hiển thị.
Trong folder Models, thêm class ProductDatabaseInitializer.cs có nội dung:
using System.Collections.Generic;

using System.Data.Entity;


namespace DMWingtipToys.Models

{

public class ProductDatabaseInitializer : DropCreateDatabaseIfModelChanges<ProductContext>

{

protected override void Seed(ProductContext context)

{

GetCategories().ForEach(c => context.Categories.Add(c));

GetProducts().ForEach(p => context.Products.Add(p));


base.Seed(context);

}


private static List<Category> GetCategories()

{

var categories = new List<Category> {

new Category

{

CategoryID = 1,

CategoryName = "Cars"

},

new Category

{

CategoryID = 2,

CategoryName = "Planes"

},

new Category

{

CategoryID = 3,

CategoryName = "Trucks"

},

new Category

{

CategoryID = 4,

CategoryName = "Boats"

},

new Category

{

CategoryID = 5,

CategoryName = "Rockets"

},

};


return categories;

}


private static List<Product> GetProducts()

{

var products = new List<Product> {

new Product

{

ProductID = 1,

ProductName = "Convertible Car",

Description = "This convertible car is fast! The engine is powered by a neutrino based battery (not included)." +

"Power it up and let it go!",

ImagePath="carconvert.png",

UnitPrice = 22.50,

CategoryID = 1

},

new Product

{

ProductID = 2,

ProductName = "Old-time Car",

Description = "There's nothing old about this toy car, except it's looks. Compatible with other old toy cars.",

ImagePath="carearly.png",

UnitPrice = 15.95,

CategoryID = 1

},

new Product

{

ProductID = 3,

ProductName = "Fast Car",

Description = "Yes this car is fast, but it also floats in water.",

ImagePath="carfast.png",

UnitPrice = 32.99,

CategoryID = 1

},

new Product

{

ProductID = 4,

ProductName = "Super Fast Car",

Description = "Use this super fast car to entertain guests. Lights and doors work!",

ImagePath="carfaster.png",

UnitPrice = 8.95,

CategoryID = 1

},

new Product

{

ProductID = 5,

ProductName = "Old Style Racer",

Description = "This old style racer can fly (with user assistance). Gravity controls flight duration." +

"No batteries required.",

ImagePath="carracer.png",

UnitPrice = 34.95,

CategoryID = 1

},

new Product

{

ProductID = 6,

ProductName = "Ace Plane",

Description = "Authentic airplane toy. Features realistic color and details.",

ImagePath="planeace.png",

UnitPrice = 95.00,

CategoryID = 2

},

new Product

{

ProductID = 7,

ProductName = "Glider",

Description = "This fun glider is made from real balsa wood. Some assembly required.",

ImagePath="planeglider.png",

UnitPrice = 4.95,

CategoryID = 2

},

new Product

{

ProductID = 8,

ProductName = "Paper Plane",

Description = "This paper plane is like no other paper plane. Some folding required.",

ImagePath="planepaper.png",

UnitPrice = 2.95,

CategoryID = 2

},

new Product

{

ProductID = 9,

ProductName = "Propeller Plane",

Description = "Rubber band powered plane features two wheels.",

ImagePath="planeprop.png",

UnitPrice = 32.95,

CategoryID = 2

},

new Product

{

ProductID = 10,

ProductName = "Early Truck",

Description = "This toy truck has a real gas powered engine. Requires regular tune ups.",

ImagePath="truckearly.png",

UnitPrice = 15.00,

CategoryID = 3

},

new Product

{

ProductID = 11,

ProductName = "Fire Truck",

Description = "You will have endless fun with this one quarter sized fire truck.",

ImagePath="truckfire.png",

UnitPrice = 26.00,

CategoryID = 3

},

new Product

{

ProductID = 12,

ProductName = "Big Truck",

Description = "This fun toy truck can be used to tow other trucks that are not as big.",

ImagePath="truckbig.png",

UnitPrice = 29.00,

CategoryID = 3

},

new Product

{

ProductID = 13,

ProductName = "Big Ship",

Description = "Is it a boat or a ship. Let this floating vehicle decide by using its " +

"artifically intelligent computer brain!",

ImagePath="boatbig.png",

UnitPrice = 95.00,

CategoryID = 4

},

new Product

{

ProductID = 14,

ProductName = "Paper Boat",

Description = "Floating fun for all! This toy boat can be assembled in seconds. Floats for minutes!" +

"Some folding required.",

ImagePath="boatpaper.png",

UnitPrice = 4.95,

CategoryID = 4

},

new Product

{

ProductID = 15,

ProductName = "Sail Boat",

Description = "Put this fun toy sail boat in the water and let it go!",

ImagePath="boatsail.png",

UnitPrice = 42.95,

CategoryID = 4

},

new Product

{

ProductID = 16,

ProductName = "Rocket",

Description = "This fun rocket will travel up to a height of 200 feet.",

ImagePath="rocket.png",

UnitPrice = 122.95,

CategoryID = 5

}

};


return products;

}

}

}
Khi DB tạo ra và khởi tạo hoàn tất, phương thức Seed bị ghi đè và cài đặt. khi Seed được set, các giá trị từ Categories và Product được lưu vào DB. Nếu ta update dữ liệu bằng cách thay đổi các giá trị trên sau khi DB được tạo, ta sẽ không thấy bất cứ thay đổi nào trên Web. Do code trên kế thừa từ lớp “DropCreateDatabaseIfModelChanges” để nhận ra việc thay đổi trên model(schema) trước khi reset data. Nếu không có gì thay đổi ở entity class Category và Product(tên, kiểu của thuộc tính, phương thức…) thì DB sẽ không bị tạo lại.
Lưu ý: Nếu ta muốn DB luôn luôn tạo lại mỗi khi chạy ứng dụng ta dùng class DropCreateDatabaseAlways thay vì DropCreateDatabaseIfModelChanges.
Sau khi hoàn thành các bước trên, ta có hình dưới đây: 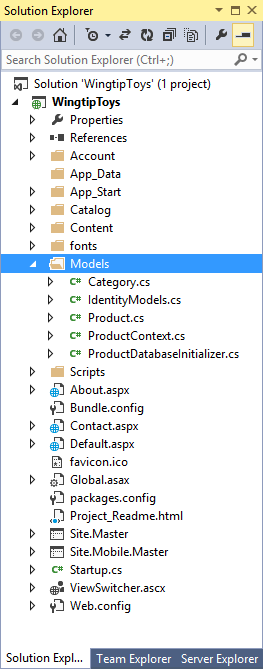
Cấu hình ứng dụng để dùng Data Model
Bây giờ ta đã tạo class đại diện cho dữ liệu, ta phải cấu hình ứng dụng để dùng các class đó. Trong file Global.asax, thêm vào code để khởi tạo các model. Trong Web.config thêm thông tin cho ứng dụng biết DB nào dùng để lưu data. File Global.asax có thể dùng để xử lí các sự kiện hay phương thức. File Web.config cho phép cấu hình ứng dụng của ta.
Cập nhật file Global.asax:
Thêm đoạn code được hightlight như trong hình vào phương thức Application_Start trong Global.asax:
       using System;

using System.Collections.Generic;

using System.Linq;

using System.Web;

using System.Web.Optimization;

using System.Web.Routing;

using System.Web.Security;

using System.Web.SessionState;

using System.Data.Entity;

using DMWingtipToys.Models;

using DMWingtipToys.Logic;


namespace DMWingtipToys

{

    public class Global : HttpApplication

    {

        void Application_Start(object sender, EventArgs e)

        {

            // Code that runs on application startup

            RouteConfig.RegisterRoutes(RouteTable.Routes);

            BundleConfig.RegisterBundles(BundleTable.Bundles);


            // Initialize the product database.

            Database.SetInitializer(new ProductDatabaseInitializer());

        }

       }

}
Khi chạy ứng dụng cài đặt các giá trị vào DB.
Chỉnh sửa file Web.config:
<connectionStrings>

<add name="DefaultConnection" connectionString="Data Source=(LocalDb)\v11.0;Initial Catalog=aspnet-DMWingtipToys;Integrated Security=True" providerName="System.Data.SqlClient"/>

<add name="WingtipToys" connectionString="Data Source=(LocalDB)\v11.0;AttachDbFilename=|DataDirectory|\wingtiptoys.mdf;Integrated Security=True" providerName="System.Data.SqlClient"/>

</connectionStrings>
Thêm thông tin connection vào ứng dụng cho phép ta chọn nơi lưu DB. Bằng việc thêm mới một connectionstring, ta có thể trực tiếp lưu DB trong thư mục App_Data, chứ không phải vị trí default của nó.
Chạy thử chương trình
Tổng kết
Trong bài hướng dẫn này ta đã tạo Data model, thêm giá trị vào DB cũng như cấu hình cho ứng dụng truy cập vào DB khi chạy ứng dụng.
Bài sau ta sẽ cập nhật lại UI(giao diện) cho ứng dụng

")
 là gì?")


")

 Code First. Để hiểu được bài này, bạn cần hoàn...)